Εμφάνιση αναρτήσεων με ετικέτα How to do. Εμφάνιση όλων των αναρτήσεων

Πέμπτη 23 Αυγούστου 2018

"Me & You" LO for 13Arts

Hello!!!! It's been a long time since my last post , but I promise that from now and then we'll keep in touch more often!

Sooooo, for today!!! I have a mixed media LO to share... A LO with a favourite photo of me and my husband . A photo that shows our happiness together.

This week , a brand new DT pack arrived and I was sooo excited with 13Arts new products! Of course , you can visit 13Arts new product page to see so many new goodies ..

                            So, my page for today .....
              With a ****NEW VIDEO TUTORIAL****


And some Close Ups!!!!!


 If you want some more inspiration , you can visit 13Arts blog to gain some great ideas from the other 13Arts DT members. 


Thank you so much for watching! 
Love
Christina


Δευτέρα 15 Ιανουαρίου 2018

"The artist's life" LO with step by step tutorial

Today I would like to show you my tutorial:
First of all , I found the Scrapiniec chipboards and the photo I wanted to scrap .
 Then I started to make my backround. I used white gesso on the papers . As you can see , I stuck two papers together to have a heavier surface.
 After that I started with the colours... I used some purple mist. I love purple...
 Now , it 's time for some modeling paste and more colour... I used some gold as my second colour. Do be afraid to use different shades. When the decoration is done , everything will match together...
 My chippies were painted in white colour to add some brightness...

This time I chose to stuck the most of them at the backround ..
I used some mist over them , too.


As you can see, I used a lot of layers , papers and gause to add more interest on my page.

Now it 's time for fun!!!You just have to decorate... I used sisal , flowers and some 3D embellies .
I used some stickers ,too.
I always choose to use a pen for emphasise the edges of my papers...


You are free to use any embellishment you want...


At the end , don't forget to add some small splashes of white or black or any of your favourite colour!!!
Your mixed media LO is ready
 And some details ,too:


Materials used:
 Thank you so much for being here!
 Kisses

Τρίτη 25 Ιουλίου 2017

Not old but Vintage -LO for 13 Arts

I'm so excited today to show you my new LO with one of the new collections of 13Arts!!!! This one is made by Olga and it's "Vintage Moments" collection so I thought that it 's the time to try some vintage style with these papers. As you can see this time I went out of my comfort zone and created a different project for me. I used a lot of metal embellishments , even a metal object from an old Desigual handbag ,and I also had a lot of fussy cutting.


I wanted to use some dark tones so I prefered to work with these papers and make some texture with medium gel through a stencil and painted the backround with some tones that reminded my past like purple mist.

Here you can see how I used my cut items beside my photo how I matched them with the other elements. As you can see , I also used some mold elements that I have painted with black gesso and have gave to them an extra colour with some liquid medium and some shiny powders..


I have also used some chippies in my backround and of course I gave more texture by using some glitter through my favourite text stencil from 13Arts.

13 arts products:


Thank you so m,uch for visiting by!!!
Hugs and Kisses 
Christina

Κυριακή 9 Ιουλίου 2017

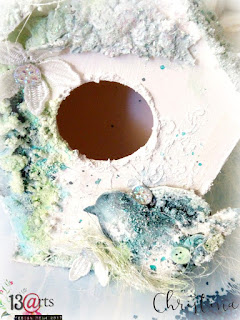
Mixed media wooden shed

Second post for today my crafty friends...This is my mixed media wooden shed for 13Arts blog and Im very proud of it and I like it very much!

You know I'm obssessed to mixed media projects and this time I wanted to make a wooden shed from 13Arts store. I'm so satisfied with my project today and it has already taken a place in my sitting room...

Well, this time I preferd to have soft tones and tones of blue and green...And some glitter , which I really love...
You can see so many details here... Full of 3D elements....And...|OK I admit that i used a loooot of glitter...I love it so much!!!


 First of all, I used whitte gesso to prepare the surface and added some texture with a stencil and some modeling paste... Then I started to use some more and more texture pasted and elements....

  You can see plastic microspheres , glass microbeads , 3D balls , buttons , glitter, glass filler and crystals....Then I started to paint it here and there with mists and Rainbow colours.....

     At the end I decorated my project with lace flowers and some sisal....

                          I hope you got insired today and like my project as much as me...
                                                                          Thank you


  Products used:
 http://13arts.pl/pl/p/Rainbow-Color-Duo-Navy-Blue/1696
 http://13arts.pl/pl/p/Rainbow-Color-Duo-Turquoise/1695
 http://13arts.pl/pl/p/Mgielka-perlowa-Green/27
 http://13arts.pl/pl/p/Gesso-biale-grunt-akrylowy-120ml/49
 http://13arts.pl/pl/p/Gesso-biale-grunt-akrylowy-120ml/49
http://13arts.pl/pl/p/MAGIC-Powder/1103
http://13arts.pl/pl/p/Zwir-barwiony-Colored-Grit-Grey-Light/1096
http://13arts.pl/pl/p/Brokat-bialy-opalizujacy-2/1224
http://13arts.pl/pl/p/Brokat-bialy-paski/1222
http://13arts.pl/pl/p/Kuleczki-szklane-D5/293
http://13arts.pl/pl/p/Mikrokulki-plastikowe/48
http://13arts.pl/pl/p/Mikrokulki-szklane/47

Σάββατο 16 Φεβρουαρίου 2013

Πως να κανετε vintage τις λευκές σας δαντέλες...

Το περιοδικό "Έτσι Απλά" το γνωρίζετε;;;Εγώ είμαι φανατική αναγνώστρια του εδώ και τεσσερα χρόνια περίπου!Είναι ενα περιοδικό που μιλά για κατασκευές παντός είδους,από μαγειρική ως ραπτική και χρηστικές κατασκευές για το σπίτι από απλά υλικά....

Κάποτε είχα διαβάσει σε ενα τεύχος πως υπάρχει τρόπος να βάψουμε της δαντέλες της γιαγιάς με ένα κόλπο....ώστε να τις κάνουμε πιο vintage...Ετσι λοιπόν σε ένα vintage μινι αλμπουμ που ετοιμάζω χρει'αστηκα πολλές δαντέλες...μα όλες όσες είχα ήταν άσπρες...Δεν πήγαιναν καθόλου με τα χαρτιά μου,οπότε θυμήθηκα το κόλπο που είχα διαβάσει και τις 'εβαψα....με τσάι και καφέ!!!!!

Είναι πολύ απλό ....Σε ενα φλιτζάνι έτοιμο τσάι ή έτοιμο καφέ φίλτρου βύθισα για μερικά λεπτά τις δαντέλες μου και τις άφησα τόσο ,όσο χρώμα ήθελα να τραβήξουν....Η προϋπόθεση είναι να μην είναι ζεστά τα υγρα,ώστε να μην κάψω τις δαντέλες...(ειδικά κάποιες είναι πολύ ευαίσθητες)....Και ιδού το αποτέλεσμα!

Η πρώτη δαντέλα βαμμένη με τσάι και η δεύτερη με γαλλικό καφέ.